Easify V4 is no longer supported and has been superseded by Easify V5.
Working With Products
In the previous help arricle we covered how to easily and rapidly create a new order and add products to it.
No doubt you will wish to make changes to your orders such as changing prices, quantities, VAT rates or even adding comments to each item on an order. The orders window allows you to do exactly those things.
Differences Between Stock Control Modes
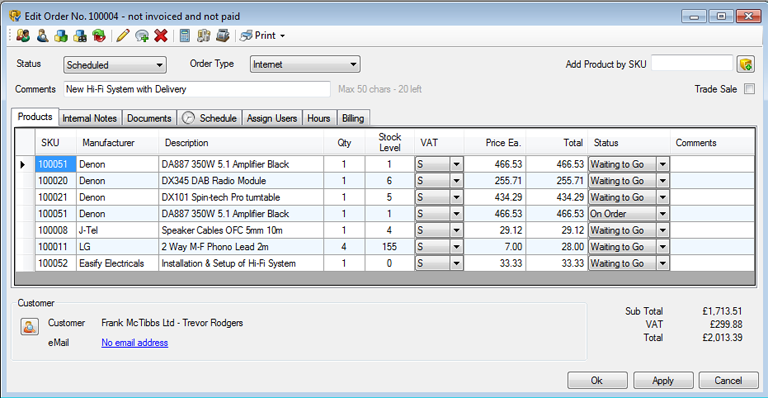
Easify can be operated in a number of stock control modes, the order window will look slightly different depending on which mode you have selected.
Order Window in Manual or Semi Automatic Stock Control Mode:

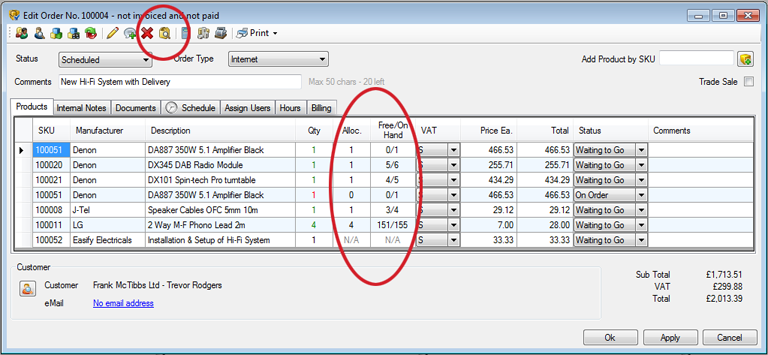
Order Window in Automatic Stock Control Mode:

As can be seen in the above image, using Easify in automatic stock control mode adds a new button to the toolbar (View Allocations for Selected Product), and replaces the Stock Level column with two new columns, Alloc. and Free/On Hand. Both these features will be discussed in depth later.
Product Columns Described
SKU: The SKU (Stock Keeping Unit) of the product.
Manufacturer: The product manufacturer.
Description: The product description.
Qty: The quantity of the product that is required. Change this value as required.
Stock Level: (Manual or Semi-automatic stock control mode only) This column displays the quantity of the
product that is in stock. This value does not update in real time, however you can refresh the values in this
column at any time by clicking the  button.
Alloc.: (Automatic stock control mode only) The quantity of stock that is currently allocated (reserved) for
this product. You can change the Alloc. value for a product yourself, either to allocate stock in order to
reserve it for an order, or to deallocate stock which frees up stock for other orders. If you wish to see
which other orders this product has been allocated to you can click the
 button.
Free/On Hand: (Automatic stock control mode only) This read only column displays two values separated by a '/' symbol. The Free value tells you how many products you have in stock that are not allocated anywhere i.e. that are freely available to sell. The On Hand value denotes how many of the products in total you physically have in stock.
VAT: (VAT registered users only) If you are registered for VAT this column displays the VAT code for the VAT rate that the product is currently using. You can alter this value if you have a product for which you want to change the VAT rate.
Price Ea.: This column contains the each price of the product.
Total: This is the total price for the product. It is calculated as Qty x Price Ea. for the product. If you are VAT registered the total excludes VAT.
Status: This column contains the status of each product on the order. You may change this value to reflect the current status of each product within an order. As an order progresses through your company you should update the product status to help you keep track of your work flow. Product status is discussed in greater detail in the Product Status help article.
Comments: This column can be used for comments that you wish to add to the products on an order. Either
type a comment directly into the comments column, or double click the comments column to open a text
editor where you can enter multi-line comments. You can also select the product and click the
 button to
open the comment editor.
Adding, Deleting and Changing Product Quantities
Adding products to an order was covered in the previous help topic.
You can change product quantities by directly entering a quantity value for the product in the Qty column.
It is possible to enter a negative quantity for a product on an order. This is useful if you are processing a product return. You can add the returned product to an order, give it a negative quantity and it will therefore be given a negative value. Alternatively you can mark the product as returned by selecting the Returned status under the drop down list. This will automatically mark the product as returned and give the quantity and value a negative value.
To delete a product from an order, simply select it and press the delete key, or select it and click the
 button.

