Working with Assemblies
Assemblies AKA Bill of Materials AKA Kits...
Easify features a multi-level Bill of Materials system that allows you to easily track and manage the stock control and workflow for complex manufactured assemblies.
Using the Product Editor you can easily create an assembly by adding products to another product, you can also add assemblies as subassemblies of products to create complex assembly hierarchies.
It is possible to create multiple versions of an assembly so that you can easily handle changes to subcomponents whilst preserving the history of any assemblies that were previously sold.
This article will concern itself with how assemblies are added to and managed on orders and quotes, click here to learn more about creating assemblies.
Adding an Assembly to an Order
Adding an assembly to an order or quotation is exactly the same as adding a simple product to an order or quotation. We have already discussed how to add a product to an order in a previous article. Click here to learn more about adding a product to an order.
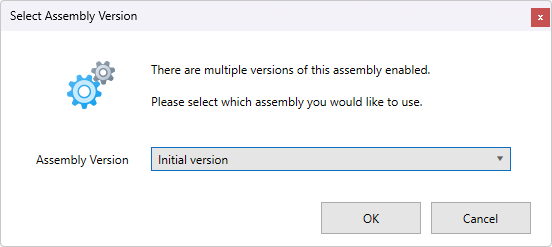
Where adding an assembly to an order differs from adding a simple product to an order is in the scenario where there are multiple active versions of an assembly. In this case when you add the assembly to an order you will be asked which version of the assembly you want to add to the order.
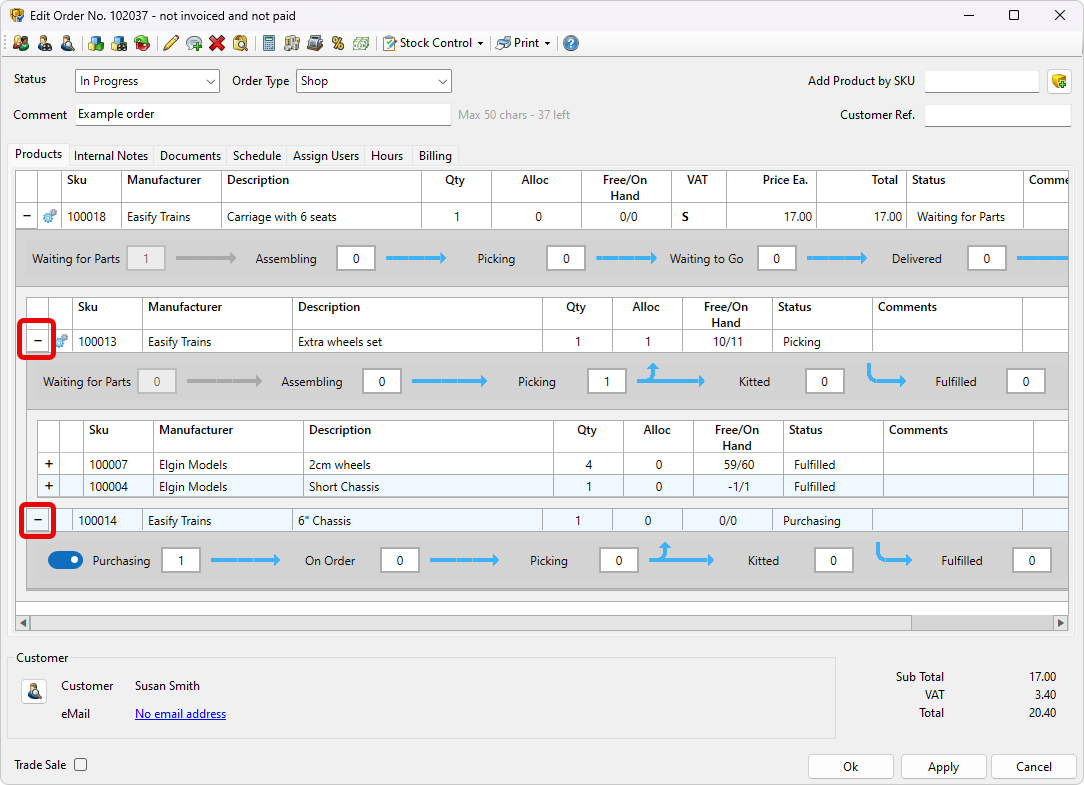
You can determine whether an item on an order is an assembly because assembly line items are denoted by a gear wheel icon to the left of the line.
Clicking the + or - symbol to the left of a line item will expand or collapse it respectively.
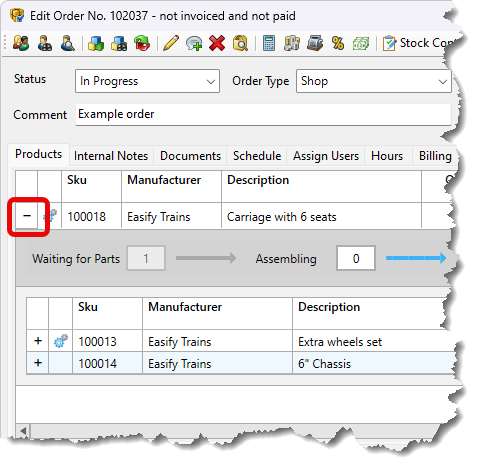
This will reveal the subcomponents and subassemblies that the assembly consists of.
The expanded view allows you to not only see the state of the root assembly in terms of how much of the desired Quantity is in each state i.e. Purchasing, Picking etc... but also to see the status of each component within the assembly.
You can continue to expand the subcomponent items all the way down and view the status of each one.
Assembly Workflow
Introduction
As far as is possible, Easify will attempt to automate the workflow of your orders and automatically control your stock levels as well as adding out of stock items to purchases for you. Simply adding a product to an order will engage the automated stock control system which will allocate (reserve) products that are already in free stock, and any items that are not in stock will be added to purchase orders.
When you proceed to place the purchases for any required stock, and subsequently book the stock in via the purchasing system as the stock arrives, the order statuses for the related items will be automatically updated.
Some of the steps in managing the workflow for items on an order are under manual control, for instance when you pick an item and move it to assembling i.e. physically transport the item from a store area to whoever will be assembling the item, this requires you to manually change the status of a line item.
Manual Workflow Example
As previously mentioned, some of the steps in your workflow during the lifecycle of processing the items on an order will by their very nature require manual user input.
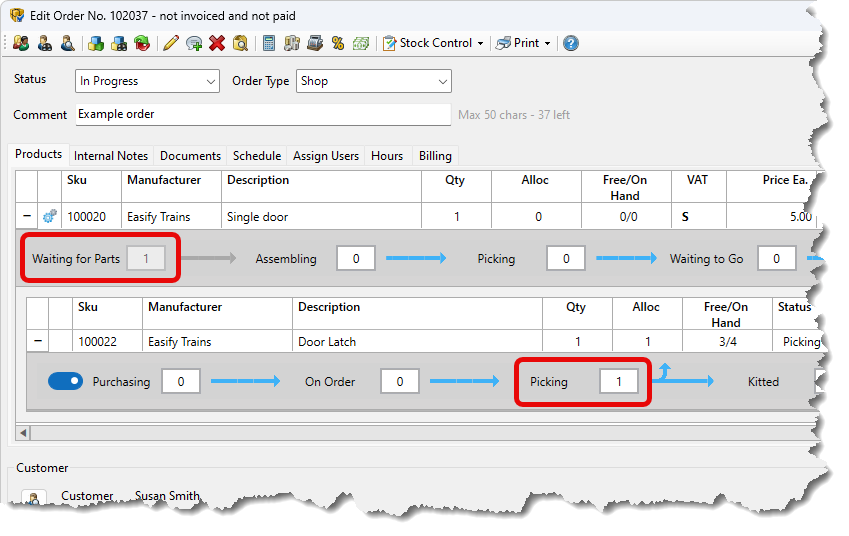
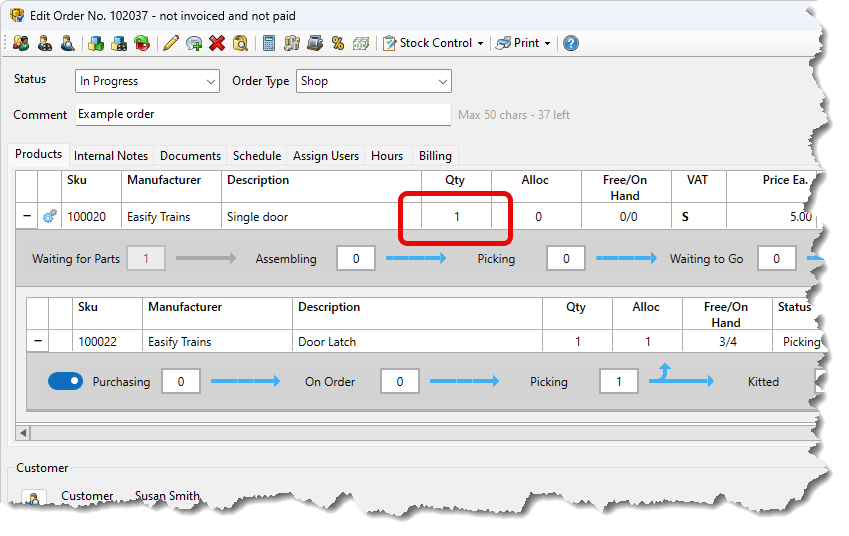
You will notice that there are blue arrows in various positions within the expanded line items. These are used to move quantities between the various states that a line item can be in.
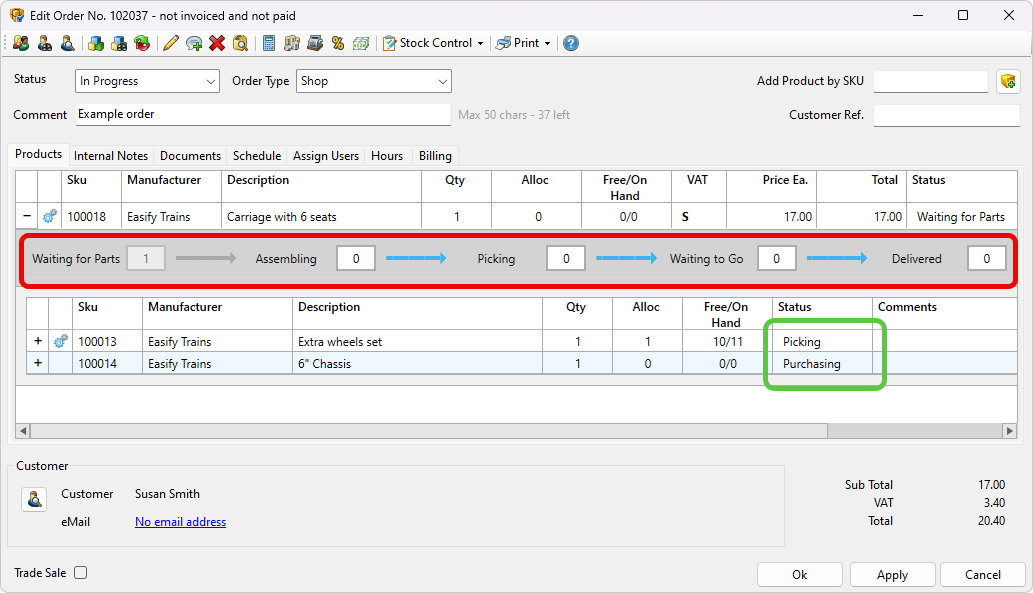
In the example below we have item 100020 Single Door which has 1 Waiting for Parts.
The subassembly 100022 Door Latch is in free stock and is showing Picking 1.
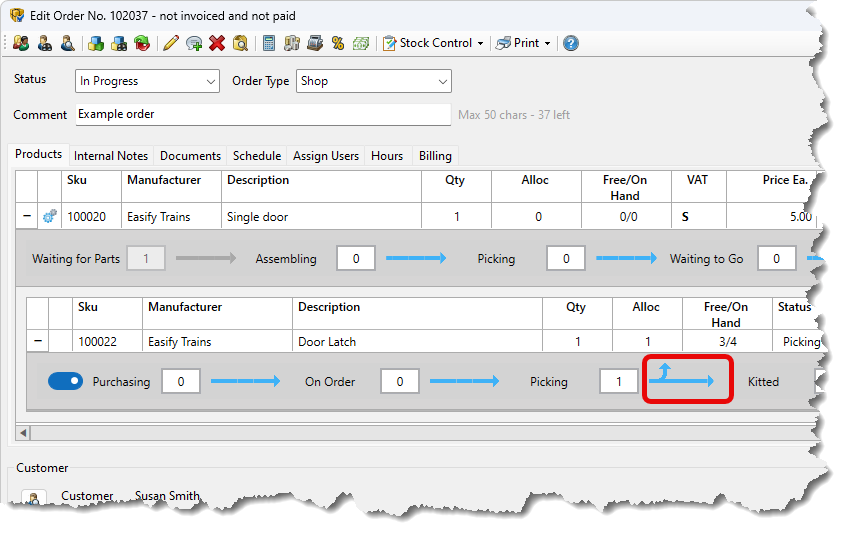
Let's say that you have physically taken the item 100022 Door Latch and for example put it on a bench to be assembled. You would click the blue arrow between Picking and Kitted to move the Picking quantity to the Kitted state.
The blue arrow between Picking and Kitted has two arrowheads. This is because this action will set the Kitted quantity of the subcomponent to 1 and will also set the parent Assembling quantity to 1. It is a compound action that affects two values.
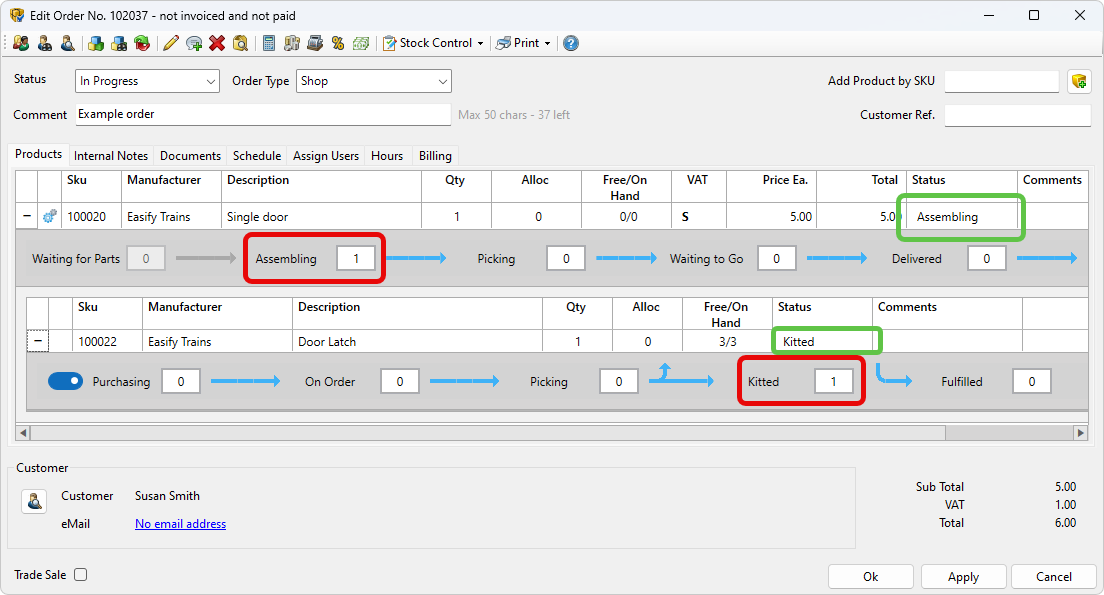
Note that the Assembling quantity is now 1, that the Kitted quantity of the subcomponent is also 1 as illustrated by the values outlined in red.
Also note that the root assembly status has changed to Assembling and the subcomponent status is now Kitted as denoted by the areas outlined in green below.
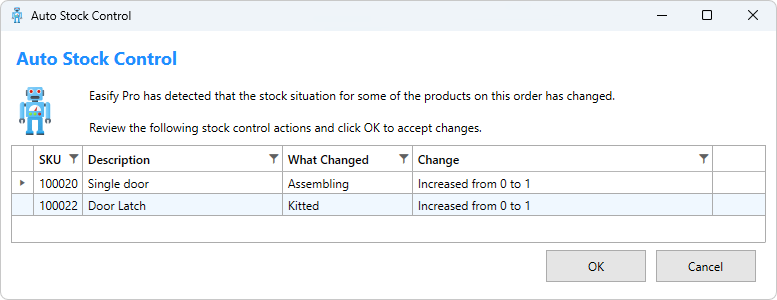
When you Click the OK button you will be presented with a list of proposed stock control actions that the automatic stock control system will execute when the order is closed.
You can use the blue arrows for other operations related to progressing an assembly through its lifecycle as an item on an order.
Ways to Change Item Quantity
To change the quantity of an item simply edit the value in the Qty box.
You can only change the Qty for top level items i.e. root assemblies or simple products. The quantities for subcomponents or subassemblies will be automatically updated when you update the Qty at the top of the hierarchy.
When you change the Qty of an item, Easify will attempt to auto-allocate the items from free stock.
When you hover over the right hand side of an arrow it will turn green indicating that the stock will be moved from left to right (forwards).
If you hover over the left hand side of an arrow it will turn dark red indicating that the stock will be moved from right to left (backwards).
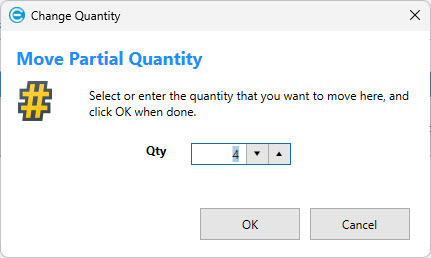
You can move a partial quantity from one state to another by holding the Ctrl key on the keyboard while clicking the arrow in either direction. This will prompt you to enter the partial quantity that you want to move.
Editing the Line Status
Each line item on an order has a Status which can be viewed and changed via a drop down list.
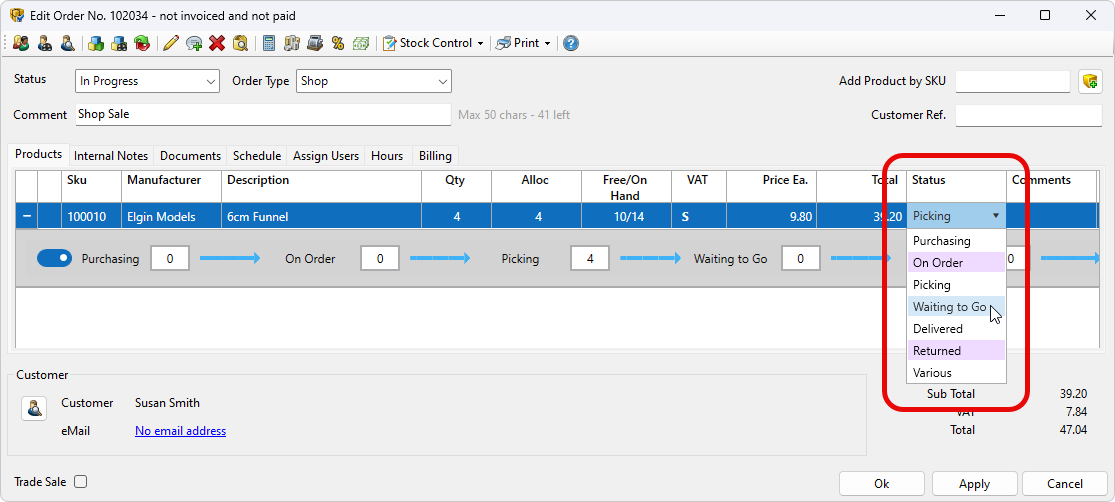
The statuses vary depending on the type of line item i.e. Simple Product, Assembly, Subcomponent etc... Click here to learn more about product statuses .
Not all statuses can be selected in any given scenario. For example you can't set the status for a product to Delivered if the product is still On Order.
When you change a line status, Easify will attempt to change all of the related state quantities to match the selected line status. For example if you have an item that is Picking 4 and you change the line status to Waiting to Go, Easify will change the Picking quantity to zero and set the Waiting to Go quantity to 4.
Stock Allocation
When you add an item to an order, or increase the quantity of an item on an order, Easify will automatically allocate (reserve) any of the quantity that is in free stock. By free stock we mean any stock that is not already allocated to other orders.
Allocation happens instantly, when a product is allocated on an order it is immediately allocated in the database, you do not need to click the Apply or OK button on the order to commit the allocation. This prevents other users from allocating or selling the product before you have had a chance to save your changes.
Allocations are also automatically applied when you save changes to the order in other words when you click the Apply or OK buttons.
Because allocations happen automatically when you save changes to the order, in the scenario where you want to de-allocate a product from one order and allocate it to the other you will need to use the following process. Open both orders, the one you want to de-allocate the item from and the one you want to allocate the item to. On the order to be de-allocated reduce the allocation (Alloc) value by the amount you want to de-allocate by, and then on the order you want to allocate to, increase the Alloc value accordingly. Because the allocations happen in real-time the product will have been de-allocated from one order and allocated to the other without the need to save changes to either order.
When Automatic Stock Control Happens
Automatic stock control for an order happens at the following times:
- When an order is opened.
- When you select Do Auto Stock Control... from the Stock Control menu.
- When save changes by clicking the Apply button.
- When an order is closed by clicking the OK button.
Auto Raising of Purchases
Easify can automatically raise purchase orders for products that are out of stock but are required to fulfil orders.
Auto Purchasing depends on Auto Purchasing being enabled. Click here to learn more about configuring Auto Purchasing .
If a product is not in stock and is required on an active order i.e. an order that is not a quotation or has been completed or cancelled, the Auto Purchaser will automatically add the product to an purchase order.
If there is an open (In Progress) Purchase Order for the supplier of the product the product will be added to that purchase order and will be linked to the order that it is required on. If there is not an already open purchase order then one will be raised automatically.
Easify will also handle removing the product from any purchase orders if it is no longer required i.e. if the product is deleted from the order or if the product quantity is reduced.
Auto Purchasing is carried out when you save changes to the order.
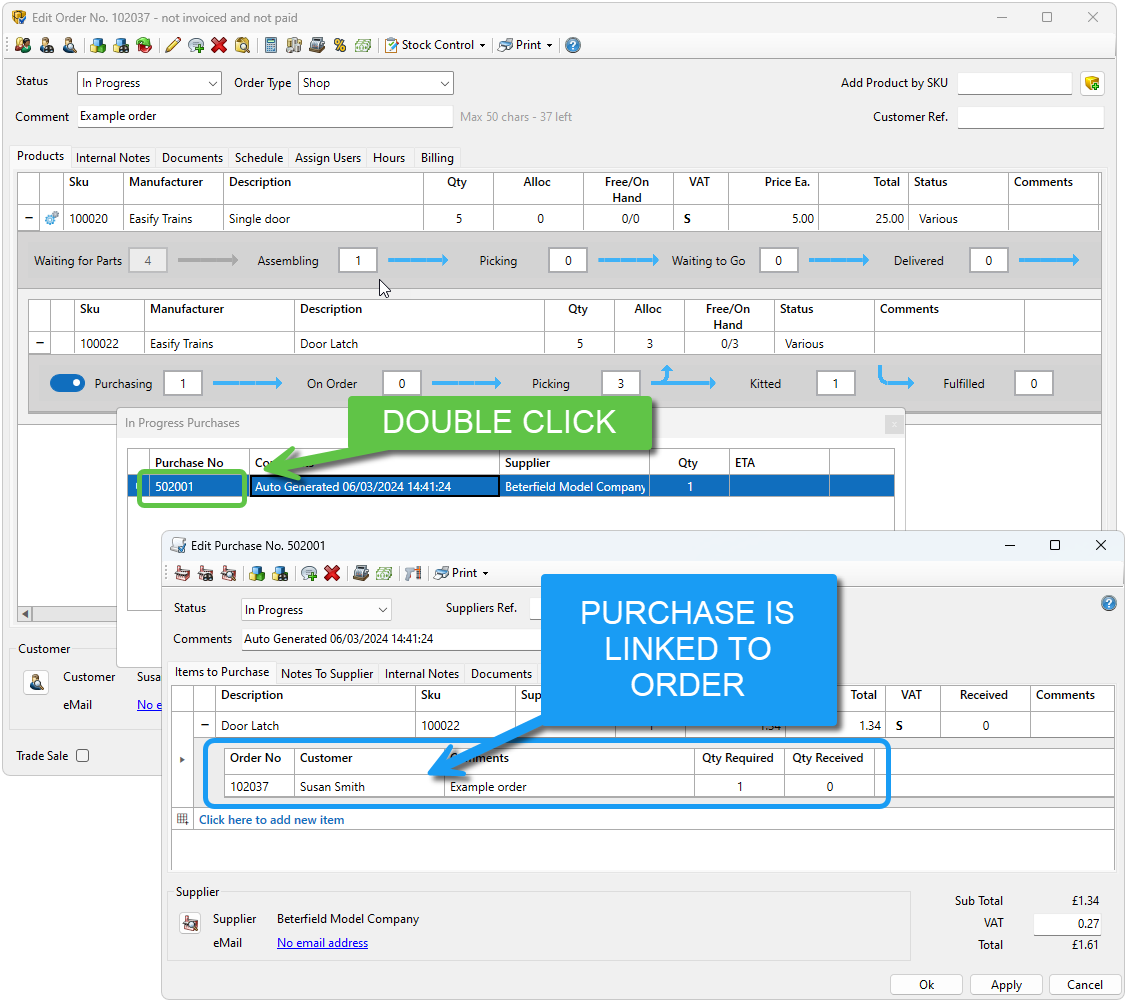
You can easily see which purchases an order is related to by clicking on the Purchases label on the relevant line item (outlined in red below). This will open the In Progress Purchases Window.
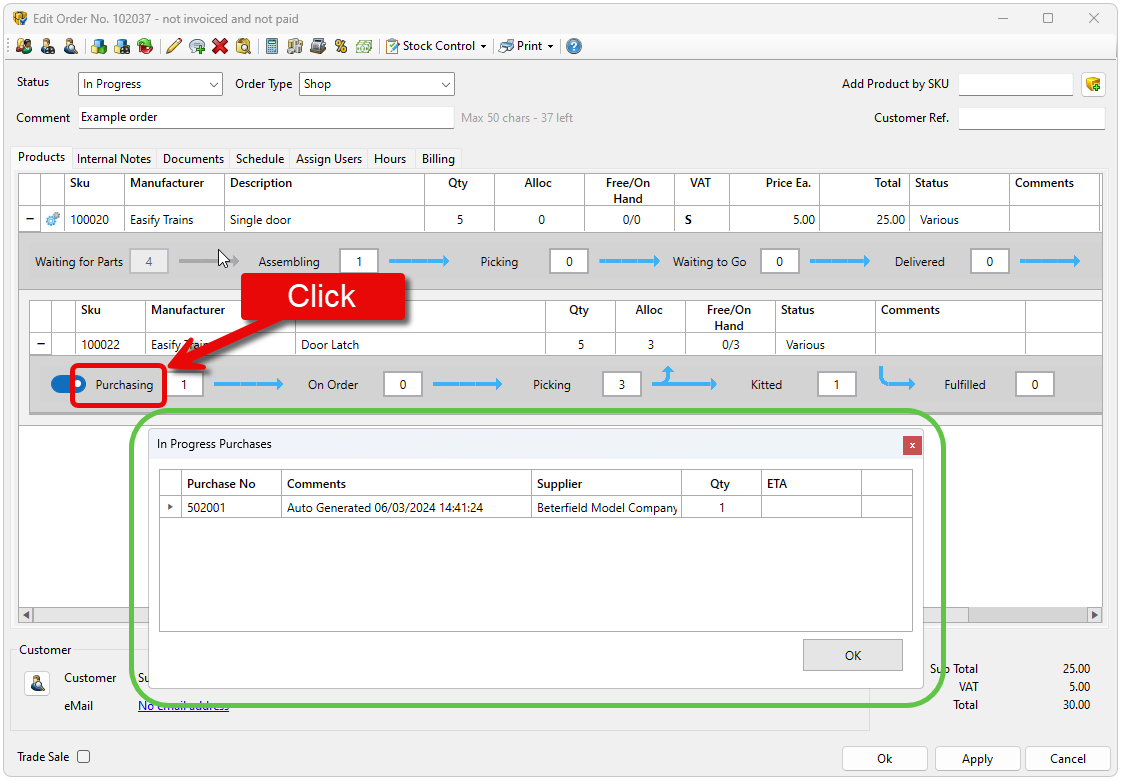
In the In Progress Purchases Window you can double click on a row to open the actual Purchase and from there can drill down to see which orders the item is being purchased for.