Easify V4 is no longer supported and has been superseded by Easify V5.
Synchronising Products
There are two ways of setting up the Easify WooCommerce Plugin when it comes to synchronising products between Easify and your WooCommerce website.
-
Products added to Easify and uploaded to WooCommerce automatically
This is the recommended way of setting things up as everything can be managed from Easify Pro and you don't need to manually edit any products in WooCommerce.
Use this method if you have a website without any products in it yet, or if you are going to copy your products from WooCommerce to Easify.
Click here to learn more about automatic product sync. -
Products added to Easify and WooCommerce manually
Use this method if you want to continue to manage your products in WooCommerce, or you have a large number of products already listed in WooCommerce.
You also need to use this method of synchronisation if you want to use product variations in WooCommerce, or if you want to take advantage of features that exist in WooCommerce but not in Easify.
Click here to learn more about manual product sync.
Products added to Easify and uploaded to WooCommerce automatically
Overview
With this, the default setup, you allow easify to manage all of your product uploads to your website.
You add products to Easify, along with images and descriptions and when you publish them from Easify they are automatically uploaded to your WooCommerce website and will from then on remain in sync with the product in Easify.
This means that you don't need to login to WooCommerce to edit a product description or image, you simply make the required changes to the product in Easify and your changes are immediately sent to your website.
Similarly, if the stock level of the product changes in Easify, the stock level will be instantly updated on your website.
This is the simplest way of working and is ideal if you have a website that does not yet have products in it, as you can enter the products in Easify, and have them automatically upload to the website.
Products added to Easify and WooCommerce manually
Overview
You might need to manually add products to WooCommerce if you have any of the following requirements:
- You have many products already in WooCommerce and you don't want to remove then and re-add them to Easify to be automatically uploaded.
- You want to take advantage of product features that exist in WooCommerce but not in Easify.
- You want to use WooCommerce product variations in conjunction with Easify.
- You simply want to manage your products primarily in WooCommerce.
Setting it up...
To setup the Easify WooCommerce Plugin to enable manual editing of products in WooCommerce, you need to make the following changes to the Product settings in the Easify WooCommerce plugin:

Ticking Don't Upload Products from Easify prevents Easify from uploading new products from Easify when they are published.
Ticking Don't Overwrite WooCommerce Categories prevents Easify from overwriting product categories that have been setup in WooCommerce.
Ticking Ignore Easify Product Updates prevents Easify from uploading changes made to products in Easify*.
* Except for product prices and stock levels which will still be synced. You can also disable updates for product price and stock level on the Easify WooCommerce Plugin products settings page if you wish.
Associating Easify Products with WooCommerce...
You will still need to be able to associate a product in Easify with the corresponding product in WooCommerce in order for product stock levels & prices to remain in sync, and also to have orders placed via your website automatically sent to Easify.
To do this, you will need to have the product present both in Easify and in WooCommerce.
If you already have the product added to WooCommerce you will need to either manually add the product to Easify, or export the WooCommerce products to CSV file, and then import them into Easify using the Easify Product Importer. You don't need to add the product images and detailed description in Easify, just the basic description, price and stock level is sufficient.
When you have added the product in Easify, determine the Easify Product SKU...

...and enter this into the SKU field of the WooCommerce product on the Inventory tab in WooCommerce.
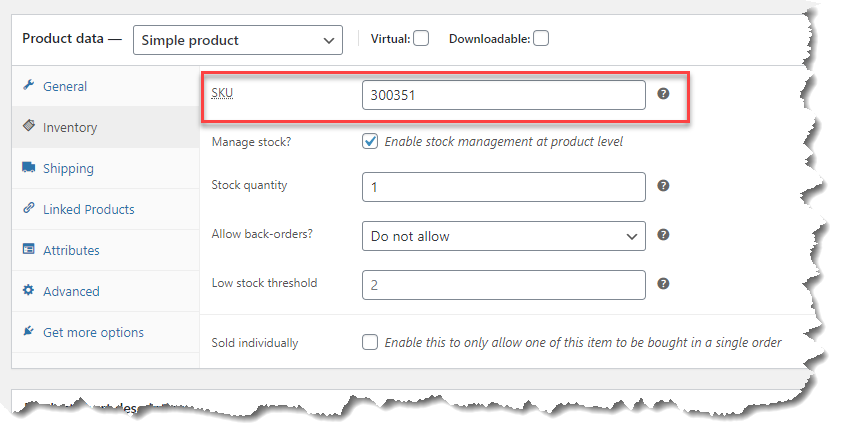
If you want stock levels to be used by WooCommerce also tick the Enable stock management at product level tickbox.
You can now continue to make any edits to the product that you wish in WooCommerce, and any changes you make in Easify will not overwrite what you have in WooCommerce (other than stock level and price if you haven't disabled these options in the Easify plugin settings).
