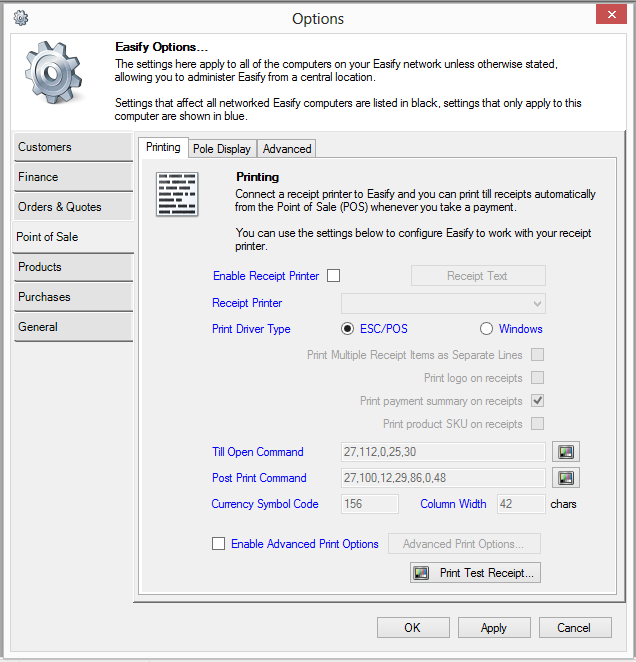
Printing
If you have a receipt printer connected you can configure it here.
Enable Receipt Printer
Select Enable Receipt Printer if you have a receipt printer connected to this computer.
Clicking the Receipt Text button will allow you to customise your printed receipts with up to 6 lines of header text, 2 lines of notes and 6 lines of footer text.
From the Receipt Printer drop down list, select the receipt printer that you would like receipts to print to.
Print Driver Type
Here you can choose ESC/POS or Windows.
If you have a thermal receipt printer that supports ESC/POS printing we recommend you choose the ESC/POS option.
If you want to print to a standard printer such as a laser or inkjet (not recommended) then choose the Windows printer driver.
Print Multiple Receipt Items as Separate Lines
Tick this if you would like each product of the same type on the receipt to be printed individually, clear the tick if you would like same products to be printed once with a quantity next to them.
Print logo on receipts
Tick this if you would like your company logo image to be printed at the top of your receipts.
The image printed onto receipts is typically located at C:\Program Files (x86)\Easify\Client\Images\EposReceiptLogo.bmp. However if you chose
an alternative location for the Easify Pro Client installation the receipt logo image file will have been installed at that location.
You can edit EposReceiptLogo.bmp using an image editing program such as Photoshop or Paint.Net. The image should be saved in a black and white format, however you can use colour images and they will be converted to black and white by Easify.
If your image prints too far to the left, you can edit the image to have an area of white space to its left using your image editor program, this will shift the image to the right when printed.
Print payment summary on receipts
Ticking this option will cause a payment summary to be printed on customer receipts listing how the payments were made for the sale. This will print the amounts paid by Cash, Card, Cheque or Other means onto the receipt.
Print product SKU on receipts
This option allows you to have Easify SKU numbers printed alongside each of the products listed on a receipt.
Till Open Command
If you have an electronic cash drawer connected to your receipt printer, you can have the cash drawer automatically spring open when a receipt is printed. Enter the till open command for your cash drawer in the Till Open Command text box. Till open commands vary between cash drawer manufacturers so you will need to check with your manufacturer for the correct code for your particular cash drawer. The command should be entered as decimal character values separated by commas with no spaces in between.
The till open command is sent to the printer automatically after printing a receipt, and also when the cash drawer is open manually via the POS main window by pressing Ctrl + O.
Post Print Command
The post print command is a sequence of characters separated by commas that is sent to the receipt printer after printing a receipt.
This command is only sent to the receipt printer after a receipt is printed, and is not sent when the till is opened. This means that you can use the Post Print Command to send a printer cut code and line feeds to eject and cut the receipt from the printer.
You can also use the post print command to send any other commands to your printer after you have printed a receipt. For instance you can use this command to configure and program your printer using ESC/POS commands. If you want to sent a one time command to the printer, you can enter the codes to send and click the Test button to the right of the Post Print Command text box. This will immediately send the command to the printer, naturally you can also use the test button to test out your print commands without having to actually run a sale through the system.
As with the till open command these characters are specific to your receipt printer and you will need to refer to your manufacturers documentation to find the correct codes for your printer.
Currency Symbol Code
Allows you to change the currency symbol that is printed on receipts. Typically you won't need to change this value as it will have been set when you configured your Easify regional settings, however if your printer uses a non standard code page resulting in an incorrect currency symbol being printed you can change it here.
Column Width
Sets the number of characters that Easify will print on each row of a receipt.
Enable Advanced Print Options
Ticking this option allows you to configure advanced POS print options that allow you to have full sized quotes, estimates, invoices, job cards and delivery notes sent to various printers at the point of sale. For instance you could configure Easify so that when you take payment at the POS, a till receipt is automatically printed and a job card is automatically printed in your workshop, warehouse or back room.
Print Test Receipt
Press this button to immediately send a test receipt to your chosen receipt printer using the settings that you have specified.
This is a handy way to test your printer settings without having to run a test sale through the system.
Easify compatible ESC/POS thermal receipt printers are available for purchase in our online shop .
