Payment Routing
When you take payments for sales in Easify, you can choose which accounts the money is routed to depending on the method used to take payment, and also whether the payment was taken via the back office on a computer, or via a till using Point of Sale.
For example you might want cash payments to be routed to your Easify cashbox account, whereas you may want card payments to be routed to your Easify current account.
You can use Payment Routing options to configure which Easify account each Easify enabled computer on your network routes its payments to.

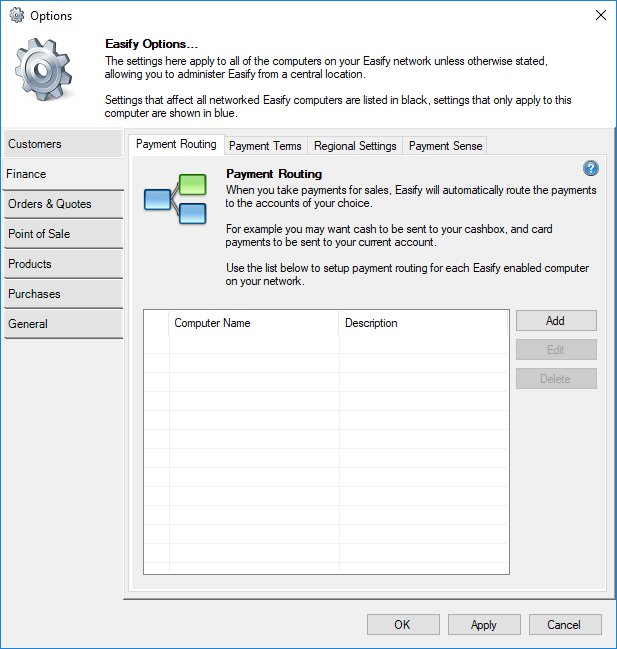
Here you can see a list of the Easify computers (and tills) on your network that have had payment routing configured for them.
Easify will prompt you to configure payment routing the first time you attempt to take payment for a sale via the Order Details of an order, or when you launch the Point of Sale for the first time.
Alternatively you can manually setup payment routing for your Easify computers by clicking the Add button.
Adding Payment Routing for a New Computer
If you want to take payments for sales via the Order details Window (accessible by double clicking orders in the main Orders & Quotes Window), any payments you enter will be routed according to the payment routing configured for that computer.
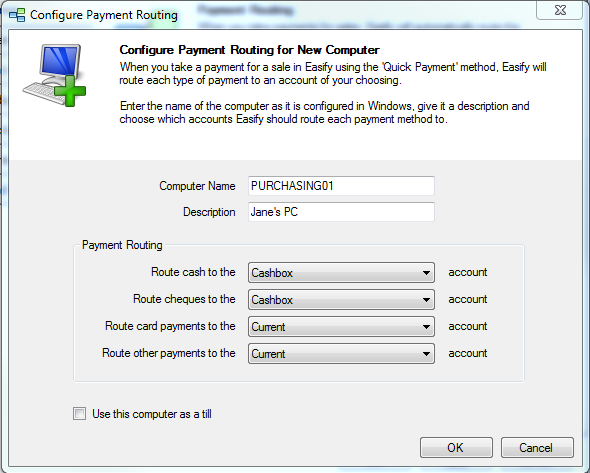
To setup payment routing for a new computer, click the Add button.

For Computer Name, enter the name of the computer as it appears in Windows.
You can find the name of your computer in Windows by right clicking 'Computer' and selecting 'Properties'.
For Description enter a meaningful description of the computer you are configuring.
Under Payment Routing you can select the destination account for each payment method that Easify accepts (Cash, Card, Cheque and Other).
Here we have accepted the default settings whereby cash and cheques are routed to the cashbox account, and cards and other payments are routed to the current account.
The Use this computer as a till option will be discussed in the next paragraph.
Click the OK button to accept your settings.
Adding a New Till
The payment routing for a till (Point of Sale) works differently to the payment routing for a computer (that isn't used as a till). When you take payment for an order via the Easify back office system on a computer, the payments will be routed straight to the destination account specified in the computers payment routing. For a till, all payments are routed into a special till account, and are then transferred to their destination accounts at the end of the shift when you cash up the till.
If you use the Point of Sale on a computer, you will need to configure the computer as a till. You can either launch Point of Sale on the computer in question, in which case you will be prompted to configure the till settings at that time. Alternatively you can setup the till via the Payment Routing options window.
To add a new till click the Add button.
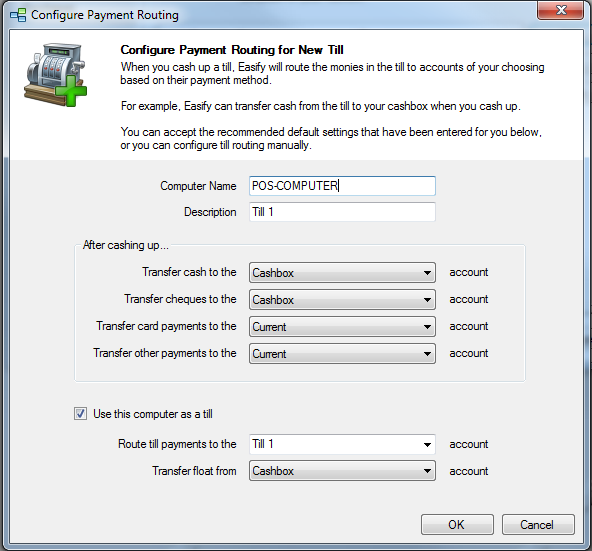
When the Configure Payment Routing for New Computer Window opens, tick the Use this computer as a till checkbox, the window will change to the Configure Payment Routing for New Till Window.

As usual the Computer Name should be set to the name of the computer that will be used as a till.
You will notice that the Description has already been generated for you. When you create a till in Easify, a new till account is automatically created for you and the name of the till account is used for the description. You are free to change the description if you wish, for example it might be more meaningful for you to rename Till 1 to Trade Counter Till.
The drop down lists where you choose payment routing for each payment method now refer to where payments will be routed after cashing up. For a plain old computer (not configured as a till) these drop down lists tell Easify where to route money when you take payment via the back office, however for a till all payments are routed straight to the till account and are only routed to these destinations after you cash up the till.
The Route till payments to the xxx account drop down list allows you to choose where payments taken on the till are routed to during the working period.
Transfer float from... allows you to specify where the till takes its float from at the start of a working period.

